
Succulent transplanting: How to do it
When watering your succulent, you notice that the roots have started to emerge from the drainage holes, and the potting soil has become as hard as a rock — it’s time to give it a new home. But looking at the delicate leaves and tangled roots, you hesitate: Will transplanting it cause any harm? In fact, transplanting is a “necessary step” in the growth process of succulents, just like how humans need to outgrow their clothes as they grow. Once the roots of a succulent have filled the pot, repotting is the only way for it to continue growing healthily. Today, we'll walk you through the process of transplanting succulents, from determining the right timing to post-repotting care, with each step clearly explained so even beginners can follow along easily.
Why transplant succulents? These signs will tell you the answer.
Succulents do not necessarily need to be transplanted every year, but when the following situations occur, they must be repotted in a timely manner:
-
Root system is overgrown: Roots are poking out of the drainage holes, or after removing the plant from the pot, you find that the roots are tangled together (“root ball”), and the soil is squeezed by the roots with no gaps.
-
Compacted soil: Water penetrates slowly after watering, the soil is hard and loses its porosity, and such soil cannot provide sufficient oxygen to the roots.
- Stunted growth: The succulent does not grow for a long time, and the leaves turn yellow and soft. After ruling out pests and diseases, it is likely that the soil nutrients have been depleted, and repotting is needed to replenish the soil.
- Newly purchased succulents: Succulents purchased online or at flower markets are often grown in temporary nutrient-rich soil. It is best to transplant them into soil suitable for long-term growth upon arrival to avoid issues later on.
Preparation before transplanting: Prepare all necessary tools and materials.
Essential tools
- Pots: Choose pots based on the size of the succulent, with a diameter 1-2 cm larger than the original pot (too large a pot may cause waterlogging). Prioritize red clay or purple sand pots (for good air permeability), and ensure the bottom has drainage holes. The One Bloom's “Succulent-Specific Pot Set” (diameter 8-15 cm) is suitable for transplanting succulents of various sizes.
- Soil: Use loose, well-draining succulent-specific soil. Beginners can purchase The One Bloom's succulent transplanting soil (60% particles, containing peat moss, perlite, and volcanic rock) or mix their own (3 parts particles + 2 parts peat moss).
- Tools: Gardening trowel (for filling soil), tweezers (for arranging roots), scissors (for trimming rotten roots), fungicide (for disinfecting roots), gloves (for hand protection, especially when transplanting prickly or toxic succulents).

Transplanting timing: Choose the right season for high success rates
The best time for transplanting is spring or autumn (the growing season for succulents), when the temperature is suitable (15-25°C), the root system of succulents is highly active, and recovery after transplanting is fast. Transplanting in summer can easily cause root rot due to high temperatures, while transplanting in winter results in slow growth and a long recovery period. In emergency situations (such as root rot), transplanting should be done immediately, regardless of the season, but care must be taken to control the environmental temperature.
Detailed transplanting steps: Complete in 6 easy steps
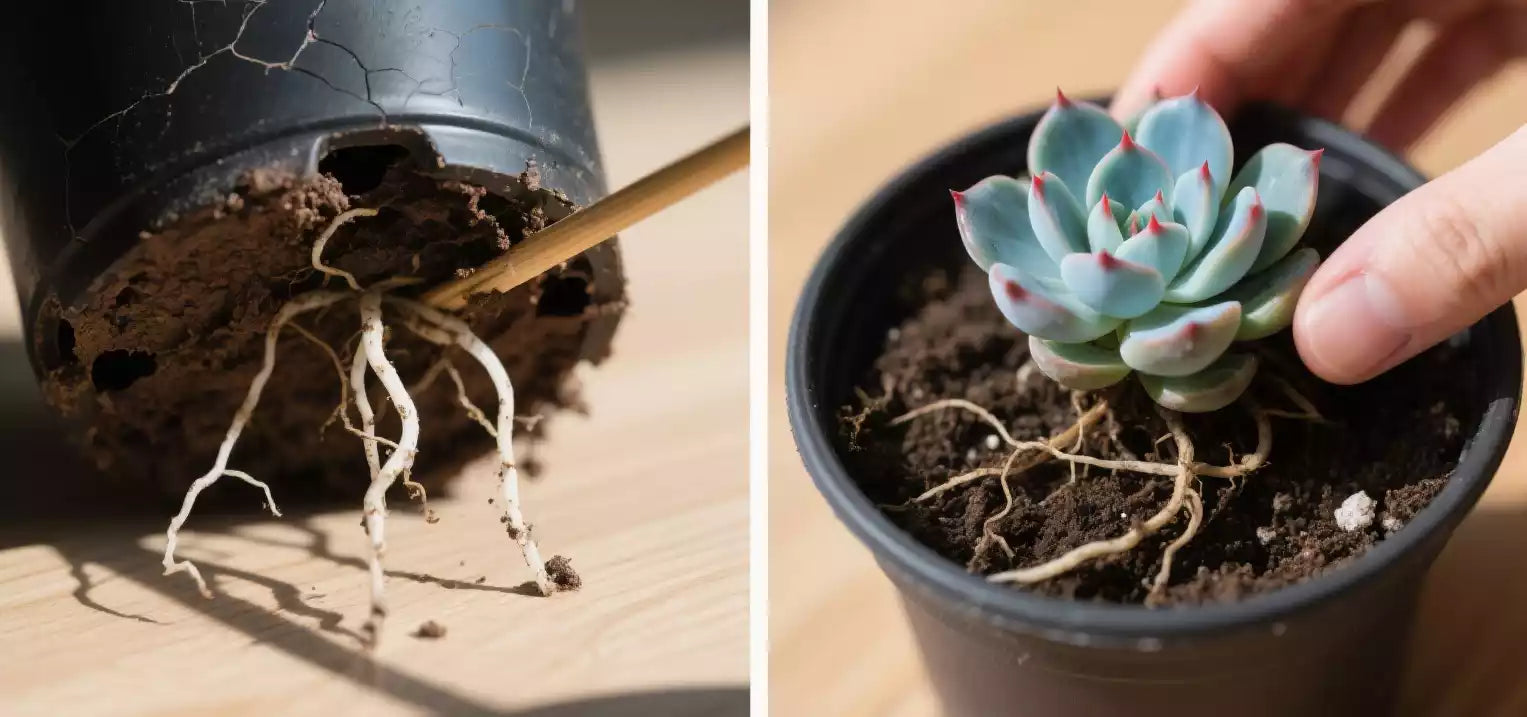
Step 1: Remove from pot — Gently remove the succulent
- Stop watering 1–2 days in advance to allow the potting soil to dry slightly, making it easier to remove the plant from the pot.
- Gently tap the sides of the pot with your hands, or insert a trowel along the edge to loosen the soil. Hold the base of the succulent and gently pull the plant out along with the soil clump. If the soil is severely compacted, you can break the pot (for disposable plastic pots) to avoid damaging the roots by pulling.
Step 2: Clean the roots and old soil
- Gently shake off the old soil from the roots to expose healthy white roots (leave a small amount of soil around the base; do not clean it completely).
- Inspect the roots: Trim off any rotten, blackened, or withered roots (use disinfected scissors, disinfecting them after each cut), retain healthy roots, and trim excessively long roots by one-third (to promote new root growth).
Step 3: Disinfection — Preventing bacterial infection
- Soak the trimmed roots in a solution of multi-fungicide (concentration 1:1000) for 10–15 minutes, then remove and place in a well-ventilated area to dry until the root surface is dry and wrinkled (typically 1–2 days, or up to 3 days for larger succulents).
- Drying is crucial for successful transplantation. Roots that are not fully dried may rot after potting, so patience is essential.
Step 4: Potting — Giving the Succulent a New Home
- Place a layer of clay pellets or gravel (1–2 cm thick) at the bottom of the pot to improve drainage, then add a small amount of soil and form a small mound in the center.
- Place the dried succulent on the mound, adjust its position to center the plant, then use tweezers to fill soil around the roots, gently compacting it (do not press too hard to avoid damaging the roots). The soil level should just cover the base of the roots (do not bury the base of the leaves in soil, as this can cause rot).
Step 5: Acclimatization — Allow the succulent to adapt to the new environment
- Do not water immediately after transplanting. Place the pot in a well-ventilated area with indirect light (such as a north-facing windowsill) to avoid direct sunlight.
- After 3–5 days (depending on the condition of the succulent), water sparingly along the edge of the pot (“root-settling water”) to slightly moisten the soil; do not overwater.
- During the acclimatization period (approximately 1–2 weeks), the succulent may experience minor leaf drop or softening, which is normal. As long as the root system is not rotting, it will gradually recover after acclimatization.
Step 6: Regular Care — Post-Transplant Management
- After acclimatization (when the leaves become plump and glossy), move the succulent to a normal light exposure location (adjust light exposure time according to the variety).
- Do not fertilize within the first month after transplanting, as the root system is weak and fertilization may cause fertilizer damage; after one month, if the succulent is growing stably, you may apply a small amount of slow-release fertilizer.
Transplanting Techniques for Different Types of Succulents
Succulents in the seedling stage: Handle with care to protect the root system
-
Characteristics: The root system is delicate, and the leaves are tender, making them prone to damage during transplantation.
- Techniques: When removing from the pot, carefully dig out the plant with a small spoon, retaining as much of the root ball as possible; use seedling soil with a 30% particle ratio (The One Bloom's succulent seedling soil); after repotting, do not compact the soil—gently smooth it out instead; extend the acclimatization period to 2–3 weeks and avoid excessive sunlight.

Old-stemmed succulents: Focus on protecting the stem
-
Characteristics: The stem is woody, and the root system is robust. When transplanting, take care to prevent the stem from breaking.
- Tips: When removing from the pot, lift from the bottom; do not grasp the stem and pull forcefully. When pruning the root system, only remove rotten roots; retain healthy old roots as much as possible. When repotting, add a small amount of granular material around the stem to stabilize the plant and prevent it from toppling over. During the acclimatization period, avoid exposure to wind to prevent stem movement from damaging new roots.
Spiny succulents (cacti, cactus balls): Take proper precautions.
-
Features: Spines can easily cause injuries, so extra care is needed during transplantation.
- Tips: Use thick gloves or paper towels to handle the plant, avoiding direct contact with the spines; increase the proportion of soil particles to 70% to prevent root rot; do not water after potting; wait 5–7 days before watering lightly to help the roots establish.
Clumping succulents: Take the opportunity to divide the plants.
-
Characteristics: Multiple plants grow in clumps with intertwined root systems; during transplantation, they can be separated into individual plants to increase the number.
- Tips: After removing from the pot, gently separate the clustered plants (try not to break the roots), use scissors to cut where they are connected, and retain part of the root system for each plant; disinfect and dry the separated plants, then repot them individually, managing them in the same way as regular transplantation.
Common Problems and Solutions for Transplanting
After transplanting, the succulent leaves become watery and rot.
-
Cause: The roots were not dried before potting, or too much water was given after potting, causing the roots to rot.
- Solution: Immediately remove the plant from the pot, cut off the rotten roots and leaves, disinfect and dry them again, replace the soil, and repot. During the acclimatization period, strictly withhold water until new roots grow.
Succulents wilting and dropping leaves after transplanting
-
Cause: The acclimatization environment has too much direct sunlight, or the root system is severely damaged and is recovering slowly.
-
Solution: Move to a more shaded area with diffused light (such as an indoor corner) to reduce water evaporation; avoid frequent watering, keep the soil slightly dry, and patiently wait for the root system to recover (which may take 3–4 weeks).
The plant tips over after potting
-
Cause: The soil is too loose or the plant is unstable, especially common in tall succulents.
- Solution: Insert a small stick around the plant and gently secure the stem with string (do not tie too tightly); remove after the roots have stabilized. Alternatively, add more particles around the roots to increase stability.
3 Practical Tips to Improve Transplant Success Rates
Soil Moisture: “Better Dry Than Wet”
During transplantation, the soil should not be too wet (it should be moist enough to form a ball but crumble apart when released). Water sparingly when establishing roots, and keep the soil slightly dry during the acclimatization period. This environment promotes rapid root growth and reduces the risk of root rot.
Avoid “Over-Pruning”
Beginners often fall into the trap of “pruning obsession,” cutting off healthy roots. In reality, as long as the roots are not rotten, it is best to retain as many as possible. Healthy roots help succulents adapt to their new environment more quickly.
Do not move the plant after transplanting
Avoid moving the pot frequently during the acclimatization period. A stable environment allows the succulent to focus on developing new roots. Frequent changes in light and temperature conditions keep the succulent in a “stress state,” prolonging the recovery period.
Make repotting a “boost” for succulent growth.
Repotting is not simply “changing pots,” but rather giving succulents a chance to “rejuvenate.” The One Bloom's horticultural experts recommend repotting most succulents once a year, which not only replenishes nutrients in the soil but also allows you to check the health of the root system. Watching the repotted succulents slowly grow new leaves and develop a robust root system is a sense of accomplishment that can only be truly appreciated through personal experience. Check your succulents now to see if they need transplanting, and give them a new home using the correct method, allowing them to thrive in their new environment!
Share